DIY: How To Shibori Dye

Okay, crafty people -- let's talk shibori! Have you tried this fun, beautiful, and magical trend?
Shibori dyeing is one of our most popular workshops in our Brooklyn store, and everyone on our staff is slightly obsessed with it. Today, we're sharing everything you need to know to learn to do your own shibori dyeing at home.
What is Shibori?
Shibori is a Japanese dyeing technique that involves folding, bunching, or bundling fabric, binding it with a resist, and dyeing it with indigo dye. The results are patterned blue lines that are both geometric and organic. There's an almost infinite number of shibori looks you can achieve, but today we're going to focus on three variations of a simple technique that's a great first try for newbies.
Let's get started!
What You'll Need

- Natural fiber fabric; white is traditional and cotton is easy to work with. In this post, we're dyeing cotton dish towels. (Old or stained white garments and housewares -- sundresses, pillow cases, curtains, etc -- are also great.)
- Shibori dyeing kit, which includes indigo dye, wood blocks, and all the necessities. (We highly recommend this kit, it's an excellent source of everything you need and you can dye tons of fabric with it!)
- A bin or bucket to mix the dye, ideally with an air-tight lid.
- A sink or hose for soaking and rinsing your fabric in water.
- Space to work and get messy; back yards are perfect for this!
Mixing the Dye
First, mix the dye according to package directions. It needs to rest for a bit before you use it for the first time, so do this step in advance. Be aware that oxygen affects the dye, so keep the mixed dye covered or in an airtight container, and avoid aggressively mixing or splashing it, to prevent oxidizing.
Folding
The way you fold your fabric determines the pattern that will emerge in your finished piece, so the end results start now at the very beginning! In this project, we're using an accordion fold. Here's how to do it:
 First, fold the fabric lengthwise, accordion style.

Next, beginning on one side, fold the fabric again accordion style.

The end result is a neat little folded stack like this.
Binding & Resist
The next step is to add a resist, and to bind the resist and fabric together. In this case, the resist we're using is wooden blocks (which are included in the shibori kit we're using here).
Simply place one wooden block on the top and bottom of your folded stack of fabric, and secure the whole thing with rubber bands. Tight/firm rubber bands will allow less indigo to penetrate the fabric folds (resulting in less blue in your finished piece), and looser rubber bands will allow more indigo to soak through (resulting in more blue in your finished piece). Experiment with different rubber band tensions to discover the different results you can create!

Here are three binding variations, from left to right:
1. This fabric stack is folded to about the same length and width as the wooden block, which will result in thin lines of blue and a lot of white in the finished piece. We used thick rubber bands on this sample because we want to achieve thin blue lines in the finished piece, so a firm binding will help achieve that.
2. This fabric stack is folded larger than the blocks on all sides. This will result in wider sections of blue in the finished piece. We used thinner rubber bands because we want a looser bind, for lots of blue.
3. This fabric stack is about the same size as the blocks, but the blocks are placed on an angle before binding. This will create slanted/oval white shapes and wedges of blue in the finished piece, rather than squares or rectangles.
Dyeing
 Now for the fun part -- it's time to dye!
First, soak your bound fabric bundle in plain water to wet the fabric, and squeeze out the excess water. Then, dip your bundle in your indigo vat. You might think that the dye would immediately soak all the way through the fabric, but it won't! The wooden blocks, rubber bands, and folded layers will all resist the dye, resulting in areas of the fabric that will stay completely white. (It's magic, we tell you!)
 Hold the bundle under the surface of the dye so that it stays completely submerged, and allow it to soak. How long you leave your piece in the dye depends on the size of the item you're dyeing, the number of layers of folds, and how much blue you want in your finished piece. (Soaking for less time will result in less blue, while a longer soak time will allow the indigo to penetrate more of the fabric, resulting in more blue.)
In this sample, we're dying a 28" square cotton towel, and we left them in the dye for about 4 minutes. Larger pieces can stay in the dye for up to 20 minutes.
It's impossible to completely control or predict the results of any shibori piece, which is part of the beauty of this craft -- but you will also want to experiment with a range of soaking times to get a sense of the various results you can create.
 When the soaking time is up, remove the bundle from the dye. Even though it's been soaking in deep blue dye, your fabric will be a light yellow-green when you take it out. That's normal!
 Next, simply let the pieces sit out and rest for 20 minutes. As the indigo dye makes contact with the air it will oxidize, turning the fabric from yellow-green to deep indigo blue. More magic!
Now all that's left to do is rinse your pieces thoroughly under water, unfold them, rinse some more... and check out the results!
(Yay!)
Here's an idea of the looks you'll get from each of these three variations:

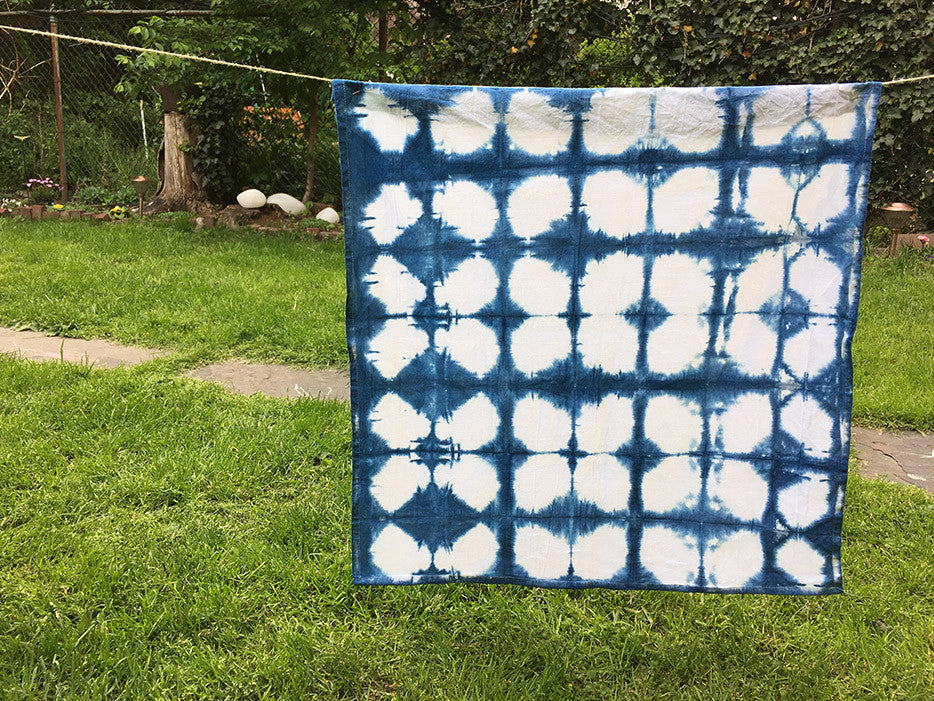
This is sample #1 from above, where the fabric was folded to the exact same size as the resist blocks, and strong rubber bands were used. The result is thin blue lines and a lot of white, with a distinct grid of rectangle shapes.
 This is sample #2 from above, where the fabric was folded larger than the wood blocks, and lighter rubber bands were used. The result is more blue in the finished piece, because more of the fabric was exposed on the edges and it was more loosely bound.
 And here is sample #3, where the wood blocks were set on a diagonal on the folded fabric. The result is slanted oval areas of white and wedges of blue, rather than rectangles as in the other samples.
...And there you have it, a peek into the world of shibori! This is such a fun technique, and is especially great for summer gatherings. Invite some friends, mix up a big vat of dye, grab some refreshments, and head for the back yard. Instant #shiboriparty!
If you use our tutorial to do your own shibori dyeing, we'd love to see what you make! Share your photos by tagging @brooklyncraftcompany and #brooklyncraftcompany.
Happy shibori-ing!