DIY: How To Sew Pom-Pom Pillows

When it comes to craft supplies, few things are cuter than pom pom trim (also know as ball fringe).
And when it comes to colors, nothing is better than neons.
So when we recently got our crafty little hands on neon pom pom trim -- well, we basically flipped over it and couldn't wait to start making all the neon pom pom things!
And so today we are sharing a tutorial for making your own pom pom trim pillows. They're super easy to make, require only basic sewing skills, and can be completed in an afternoon. Which means your sofa will be thanking you as soon as tonight.
Wanna learn how to make them? Let's go!

Materials

For this project you'll need:
- Neon pom pom trim >> BUY IT HERE!
- 1 yard fabric per pillow. We used:
- Cotton + Steel Black and White Lantern >> BUY IT HERE!
- Kona Cotton in Shadow >> BUY IT HERE!
- 16" pillow forms; one per pillow
- Thread to match your fabrics and trims
Tools required: Measuring tape, scissors, ruler or straight edge, basic sewing supplies, sewing machine, iron.
Skills required: Beginner-level sewing knowledge is all you need!
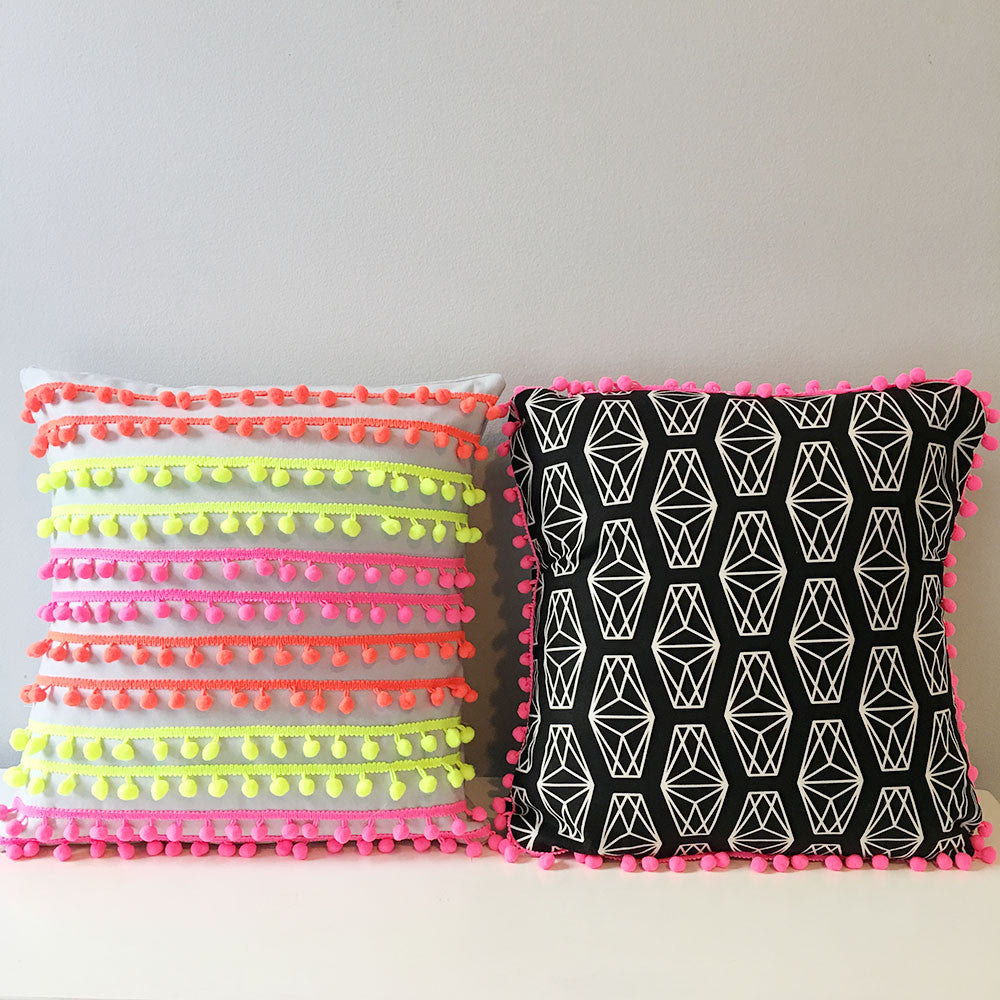
PILLOW 1: POM POM BORDER

This version has pom pom trim sewn into the side seams, like piping. It's super easy to do and results in a really cute pillow with a fun edging that is perfect layered with other pillows in a group. Because the trim is only on the outer edges, a busy fabric print is a great choice for this style.
Cutting

Cut the following to make Pillow 1:
- One 16" square piece for the pillow front
- Two 16" x 18" pieces for the pillow back
- 66" length of pom pom trim
After cutting the fabric pieces, use a cup or glass to trace a curve on each corner, and cut the curve to make rounded corners. Not only are rounded corners a cute look on pillows, but it is also much easier to sew the pom pom border on rounded corners. Win win!
Note: you may be wondering why we're not adding a seam allowance, and the reason is that skipping a seam allowance will result in a finished pillow cover that's slightly smaller than the pillow form, which will make the finished pillow look nice and plump. If the pillow cover is larger than the form, even by a little bit, it can look baggy and sad. Plump pillows are happy pillows!
Assemble the Pillow Front
Next, pin the 66" piece of pom pom trim all around the perimeter of the pillow front, with the poms facing inwards and the right side of the fabric facing up. We set our trim in about 1/4" from the raw edge of the fabric to allow room for a seam allowance on the fabric, since the tape on this trim is a bit narrow.

At the point where the ends of the trim meet, overlap the two ends and pin them with the tails facing away from the pillow (this will ensure that they're hidden in the seam and don't show in the finished pillow).

Now it's time to sew! Using a regular stitch, simply sew around the perimeter of the pillow top, stitching the trim to the fabric. The seam allowance isn't super important here; about 1/2" is fine.
Assemble the Pillow Back

Cut the two back pieces per the measurements above, and round the corners as above. Fold each piece in half with the right sides out, and press the fold.

Now place one back piece over the pillow top as shown. The folded side of the back piece should be in the center of the pillow. Pin in place, and sew around all three outer sides, leaving the folded edge open.
Next, add the second back piece the same way as the first. The folded edges of the two back pieces will overlap each other in the center of the pillow, creating an envelope closure.

Now, just turn the pillow right-side out, insert your pillow form, and this pillow is DONE! So cute and easy, right?!
PS: here's how the envelope closure will look on the back of the pillow. If you find that the opening tends to gape open with use, you can add a button or velcro to secure it, or even baste it closed with a few hand stitches.
PILLOW 2: POM POM FRINGE PARTY

This version features rows of pom poms across the front, resulting in a party pillow that just wants to have fun! This cutie looks great front and center in a pillow group, or solo as a statement pillow on an accent chair or bed. Because the trim is so busy, solid fabrics are a good choice for this design.
Cut the following to make Pillow 2"
- Cut one 16" square for the pillow front.
- Cut two 16" x 18" pieces for the back.
- Cut twelve 16" lengths of pom pom trim (we did four lengths each of three different colors).
Note: for this style, we did not curve the corners because it's a more linear design and we thought sharp corners would look better!
Assembling the Front

Using a ruler and pen or pencil, mark a line every 1 1/4" on the right side of the pillow front.

Sew one length of pom trim on each line, placing the trim directly over the line to cover it. For this step, use a zig-zag stitch and thread to match your trim.

Keep going till all the trim is attached!

And here's how the pillow front will look when all the trim is added.
Now all that's left to do is attach the two back pieces, which is done exactly the same way as Pillow 1 (see above).

And that's it, you're done!
If you make this project, we want to see your photos! Tag us @brooklyncraftcompany and #brooklyncraftcompany.